
Clay Lantern Houses
(Week #3 of 6 week Clay Course)
Materials Needed:
Sketch paper and pencils
Low fire clay
Soda cans, juice bottles or small jars
Paper, cut into strips 4" x the circumference of the jar or can
Masking tape
Clay tools
Rolling Pins and wooden strips
water in containers
Clay mats
Process
- Spend a few minutes making quick sketches of ideas for Lantern Houses (fairy house style, modern, thatched roof, etc).
- Wrap a paper strip (4" wide) around a container (jar, bottle or can) to determine the circumference (ours were about 11 to 12 " for a small jar). This will act as a template for the house.

- Using the paper strip as a size guide, roll out the clay between the wooden strips until the the template fits on the slab. When rolling, make sure clay is uniform in thickness, slightly less than 1/2".

- Lay the template on the slab. Trace with a tool and cut out, adding about a 1/4" onto the length.

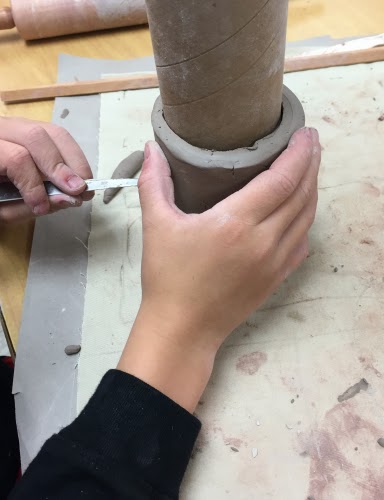
- Next, wrap the cut slab piece around the paper-covered can. Slip and score the edges and join. Smooth the seam.
- Roll out another slab, this time in the shape of a pancake. This will be the floor of the lantern house. Set the lantern house in the middle of the clay pancake and trace around the bottom edge. Cut out the circle. Slip and score the TOP of this circle AND the BOTTOM edges of the lantern house. Join and smooth the seam.
- LEAVE THE CAN OR JAR IN PLACE RIGHT NOW.
- Using a tool, cut door and window shapes in the lantern. The edges will be jagged. This is OK as we will smooth it out in a few minutes.


- With extra clay, add decorations like shutters, vines, leaves, etc. Remember to slip and score these additions.


- Now for the roof....roll out one more slab. For a circular or square roof, set the lantern on the slab and trace around the bottom, making the roof at least 1/2" wider all around than the base of the lantern. Cut out the shape and if desired, add a handle to the top (make a fat snake, slip and score both ends and attach to roof). Decorate roof with clay tools to create the look of tiles, thatch, etc.


- A few students wanted to make a pitched roof so they cut out shapes to form a stand-up roof and then added a handle to the top. NOTE: directions on removing can or jar are listed below. For those doing PITCHED roofs, the can will need to be removed first and the lantern will need to be filled with crumpled paper towels to give needed support to the roof as it dries.


- Almost finished....SLOWLY AND GENTLY (while holding the lantern at its base) twist the can, bottle or jar and lift to remove. Take out the paper strip that will be stuck to the inside walls.
- Smooth out all window and door edges. If making a pitched roof, remember to gently place crumpled paper towels inside the lantern to provide structural support for the roof.


- FINAL STEP....Lay a paper towel over the lantern before placing the roof on top. This will allow both pieces to dry without sticking together. When completely dry, bisque fire and then glaze
We'll be adding photos of our glazed lanterns once completed. A nice touch would be to add small battery operated candles as a light source.
No comments:
Post a Comment