
Clay Animal Banks
(week #2 of 6 week Clay Course)
I recently offered an After School Clay Club and was thrilled when several fourth graders enrolled. These students love to work with clay and were eager to have more opportunities to work in this medium. The class I designed is a 6 week course starting with basic pinch pot construction and then proceeds to add new building techniques each week. Here, I'd like to share our journey through this course. Each class is 75 minutes, which includes clean up time.
We used last week's pinch pot project as a starting point in week 2: Clay Animal Banks
I briefly discussed the history of the term Piggy Bank and its origins in the materials first used to create containers for food and then later, money. Pygg, the orange colored clay, was used by potters to make dishes and food storage vessels. People began saving coins in their ceramic food jars. After some time, when potters were requested to make containers for children, they started making pigs, in reference to the clay they used and the name stuck.
We looked at pictures of ancient piggy banks (here) and I researched here for written info on the origins. We discussed the animals themes, the types of materials used and the way identifying details were added with paints or glazes.
Process:
- We used low fire red clay for this project. Make 2 pinch pots of similar size. Remember to use the Pinky Test (measure the sides of your pot using your pinky finger as the standard. Pot needs to be as thick as your pinky) to help ensure stability.
- Wad up some newspaper and put in one pot to help provide support
- Gently tap the tops of the pinch pots on the table to slightly flatten them. This aids in providing a more solid surface when joining the two pots
- Slip and score the pots. Smooth the seam so it looks like a smooth ball
- Gently drop the ball on the table to slightly flatten the bottom
- Select the type of animal you'd like for your bank. Could be a real or imaginary one. Decide if it will be standing or sitting or lying down
- Using extra clay, add the head, legs, tails, wings, and other major body parts. Remember to slip and score each piece and then smooth the area where the two pieces were joined so it looks like it was made out of one piece of clay.

Swan made of 2 pinch pots. Extra clay added to make the neck and head
 |
| Adding a head and neck |
 |
| Adding facial features using slip and score |
- Use clay tools to add the textures of scales, fur, feathers, hair and other surface decoration.
 |
| Adding texture |
 |
| Hair and fur added with scratching tools |
- Finally, use a clay tool to make an opening for the coins. Make the cut longer and wider than the size of actual coins as the clay will shrink on drying and we want to ensure the coins will fit through the slot. Also, if you make the slot large enough, you will be able to remove the money from your bank by shaking it out through the opening.

Cutting a coin slot
- Last steps include signing your bank with your initials and doing the once over to make sure all pieces are securely in place and all cracks are smoothed.


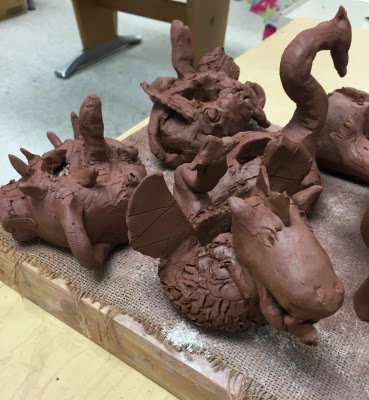 | |
| Monkeys, dragons, swans |


- After the bisque firing, pieces were glazed and fired again.
 |
| Glazed Swan Bank |


No comments:
Post a Comment