Showing posts with label Vessels. Show all posts

Tuesday, December 13, 2016

Clay 3 : Reception and Exhibition of Children's Clay Art

Student's display
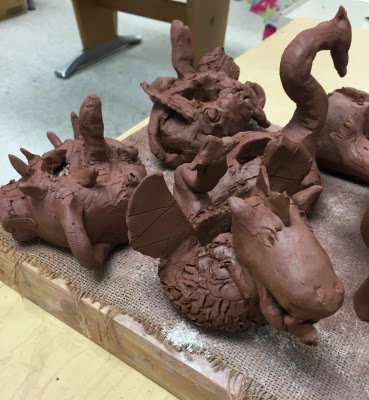
 We completed our Clay After school workshop for students in third through fifth grades. During the five sessions, we created Story Teller Figures, Dragons, Gargoyles, and Vessels, using a variety clay and finishing techniques. At the completion of each workshop, we hold a Reception and Exhibition. Students self curate their work and this event provides an opportunity for them to showcase their work and answer parents' questions about the various topics and techniques they learned over the course of the workshop.

Special thanks to art teacher Sarah Sheckells for making this possible. Also, to local artist Tina Preece for her classroom assistance and expert firing of students' work.
Story Teller, Dragon, Gargoyle, and dish
Gargoyle, Story Teller, Dragon, and dish
Cat Gargoyle
Dragon
Animal Story Teller Figure
Glazed Dragon
Display of visuals used during the workshop
More visuals used during the course
Completed dish
Completed dish

Clay 3 : Dishes inspired by Nature

Student made dish using natural materials
Week 4 of our Clay 3 After school workshop for students in grades 3 through 5. The main focus this week was on using a slab technique to create a footed vessel.

Materials Needed
Sketchbooks and pencils
Low fire white clay
Food safe glazes
Canvas mats for work surface
Clay tools
Water
Assorted collection of branches, leaves, stones, shells, etc.
Newspaper and masking tape
Cardboard bats for storage of pieces during drying

Directions:
1. We looked at and discussed different types of vessels people use for various reasons.  

2. We spent a few minutes making quick drawings in our sketchbooks to generate ideas for designing the surface of our vessels (bowls).

3. Each student got an 8 oz ball of low fire white clay. Using their hands, they patted it out into a large pancake shape, smoothing the edges. 

4. Using the clay tools, we changed the rim of the bowl to create an uneven, organic look to the edge.

5. Next, we used a variety of natural elements to press into the top surface of the bowl, pressing hard and allowing the leaves to stay in the clay.
Dishes drying in preparation for firing
 
Embellishing with items from nature

6. Borrowing an idea I found on a children's clay website, we picked up the printed slab pancakes and slapped them onto our bent knees!  They liked this part of the lesson. A few slapped their bowl two or three times until their bowls were the desired shape.

7. Next, we wadded up newspaper and wrapped with masking tape, securely taping the crumpled wads onto cardboard bats.
We draped the shaped bowls over the newspaper. 


8. After that, we used a bit of additional clay to make 3 feet and added them securely to the bottom of the bowls.

9. Final step: We turned the whole thing upside down and gently pressed the feet of the bowls on a table top to create flattened bottoms. We then turned the bowls back, feet up, to dry.

After the bowls were dry, they were fired.

Dried pieces in kiln ready for firing

10. For decorating, the students painted a thick layer of food safe glaze on the top surface and then put the bowl under a gently, running faucet (over a bucket so as not to allow glaze water down the sink) to rinse some of the glaze off. After blotting the bowls with paper towels, everyone glazed the under sides of their bowls (leaving the bottoms of the feet unglazed).
Student work
Student work

Student work

Friday, June 19, 2015

Egyptian Style Clay Canopic Jars


Egyptian Style Clay Canopic Jars
(week #4 of a 6 week clay course)

For the 4th week of our clay course, we learned about how the Egyptians designed and built ceramic jars to hold the internal organs of people who were mummified. The jars were buried with the bodies. We decided to make our own version of these jars, choosing our favorite animals and using the jars to hold things like art supplies.

Supplies Needed:

sketch paper and pencils
low fire clay
rolling pins to make slabs
cutting tools
paper to make patterns
paper towel tubes with heavily taped bases
 
Rolling out the slab           


  • Make quick sketches of animals that would make good designs for the jars
  • Roll out the clay. Use strips to ensure the clay is even
  • Make a pattern using paper by wrapping some around the paper towel tubes (the tube ends covered in heavy masking tape to prevent their cutting through the clay). Make the pattern about 6 inches in height and wide enough to roll around the tube one time
  • Trace the pattern onto the clay and add a little extra to the width so the clay will wrap all the way around the tube and have a little extra for joining at the seam.
  •  Tape the pattern around the towel tube
  • Wrap the clay slab rectangle around the tube and join the seams by slipping and scoring. Leave the tube INSIDE the clay for now. It will be removed later before drying.
  • Wrap clay slab around the tube and join seams
  • Pinch out a small pancake and set the clay covered tube on it. Cut out a circle at the base. This will be the bottom of the jar. Trim excess and using slip and score, attach the bottom to the jar.
    • Push clay to end of tube and add a bottom for the jar, making it from a small pancake slab. Attach securely.
     
     
    • Trim the top of the tube so it is 1 to 1 1/2" above the top of the jar.
    • Using a ball of clay, shape an animal head, adding features like ears, horns, eyes, and textures to show feathers, fur, scales, etc.
    • Make an indent in the bottom of the animal head and attach it to the top of the jar, slipping and scoring the two seams.
    • Using a clay tool, cut a line around the jar to separate the head from the rest of the jar. The line could be wavy, zig zaggy or straight. 


Use modeling tools to add details


  • Next, draw hieroglyphs to add your name down the front of the jar. Use the modeling tools to add textures like fur, scales, feathers, etc.    
    Adding ears
                          
Completed jars before firing


jar made by a fourth grade student

                                                     
Completed canopic jars

                                                       
Paper towels added before drying


Some FINAL and VERY IMPORTANT steps.......

  • When the jar is completed, remove the head and set aside. Have someone hold the jar at the base and then use two hands to GENTLY TWIST the paper towel tube UP AND OUT. Note:  The tube MUST be removed before the piece is set out to dry or the clay will shrink around the tube and not be removable without breaking the jar.
  • Put a paper towel on the top of the open jar.
  • Set the head in the proper position on top of the paper towel on top of the tube. Allow to dry.
  • Before firing, separate head and body and toss out paper towel.
  • After firing, glaze or decorate with acrylic paints and a gloss medium or modge podge type product.

Monday, April 20, 2015

Clay Animal Banks


Clay Animal Banks
(week #2 of 6 week Clay Course)
I recently offered an After School Clay Club and was thrilled when several fourth graders enrolled. These students love to work with clay and were eager to have more opportunities to work in this medium. The class I designed is a 6 week course starting with basic pinch pot construction and then proceeds to add new building techniques each week. Here, I'd like to share our journey through this course. Each class is 75 minutes, which includes clean up time.

We used last week's pinch pot project as a starting point in week 2: Clay Animal Banks

I briefly discussed the history of the term Piggy Bank and its origins in the materials first used to create containers for food and then later, money. Pygg, the orange colored clay, was used by potters to make dishes and food storage vessels. People began saving coins in their ceramic food jars. After some time, when potters were requested to make containers for children, they started making pigs, in reference to the clay they used and the name stuck.

We looked at pictures of ancient piggy banks (here) and I researched here for written info on the origins. We discussed the animals themes, the types of materials used and the way identifying details were added with paints or glazes.

 Process:
  • We used low fire red clay for this project. Make 2 pinch pots of similar size. Remember to use the Pinky Test (measure the sides of your pot using your pinky finger as the standard. Pot needs to be as thick as your pinky) to help ensure stability.
  • Wad up some newspaper and put in one pot to help provide support 
  •  Gently tap the tops of the pinch pots on the table to slightly flatten them. This aids in providing a more solid surface when joining the two pots
  • Slip and score the pots. Smooth the seam so it looks like a smooth ball  
  • Gently drop the ball on the table to slightly flatten the bottom 
  •  Select the type of animal you'd like for your bank. Could be a real or imaginary one. Decide if it will be standing or sitting or lying down
  • Using extra clay, add the head, legs, tails, wings, and other major body parts. Remember to slip and score each piece and then smooth the area where the two pieces were joined so it looks like it was made out of one piece of clay.                                                
    Swan made of 2 pinch pots. Extra clay added to make the neck and head
                                                            
                                                        
Adding a head and neck
                                                      
Adding facial features using slip and score

  • Use clay tools to add the textures of scales, fur, feathers, hair and other surface decoration.
                                                         
Adding texture


Hair and fur added with scratching tools

  • Finally, use a clay tool to make an opening for the coins. Make the cut longer and wider than the size of actual coins as the clay will shrink on drying and we want to ensure the coins will fit through the slot. Also, if you make the slot large enough, you will be able to remove the money from your bank by shaking it out through the opening.                             
    Cutting a coin slot
  • Last steps include signing your bank with your initials and doing the once over to make sure all pieces are securely in place and all cracks are smoothed.
These banks will be later bisque fired so we can add glazes. 
                                                         

Monkeys, dragons, swans
  • After the bisque firing, pieces were glazed and fired again.
                                                     
Glazed Swan Bank