Monday, June 22, 2015

Clay Sunflower Yard Art


Clay Sunflower Garden Art
(week #6 of a 6 week clay course for kids)
Since this was the final clay class before school let out for summer holiday, we decided to focus on creating pieces for our gardens using terracotta clay. We looked at images of sunflowers, made clay versions and then added whimsical facial expressions. The finished pieces could either be laid in the garden or put on a metal stake for display.
Supplies and Materials Needed for this Project
 Sketch paper and pencils for recording ideas
Low fire terracotta clay
Rolling pins
Modeling tools
Bamboo skewers or skinny dowel rods
  • Roll out clay using wooden strips to ensure uniform thickness for base of flower
  • Cut out a basic sunflower shape


  •  Next, make petals for the flowers, either by cutting out shapes from the slab or hand forming. Use slip and score technique to securely attach all petals to the base. Add interest by overlapping the petals.
                                              

  • Using the modeling tools, add texture to the petals
                                                      
                                                
  • Once all the petals are in place, use a piece of clay to form a small ball, slightly flattening it on one side . This will be the center of the flower
                                                        

  • Attach the ball to the flower's center (slip and score). Next, begin making facial features out of small bits of clay and adding them to the ball.
                                              
A student adds a smile to her sunflower

  • Consider the expression on the flower's face and how shaping the clay can show that expression. Use a tool to add designs for seeds if desired
                                         

  • Some students added insects to their flowers. Double check to ensure all bits are securely attached.
                                                        

  • The final step is taking a bamboo skewer or small dowel rod and making a hole in the flower, if it is to be displayed on a stake in the garden. Hold the flower in one hand and gently push the skewer or rod into the bottom of the flower, rotating it as you go. Set aside to dry. NOTE: AFTER A FEW HOURS, TURN THE SKEWER OR ROD GENTLY IN THE FLOWER AND THEN REMOVE
  •  The rod MUST BE REMOVED before the clay is completely dry or the clay will shrink and breakage will occur on trying to pull it out later
  • Allow clay to dry completely and then fire.
                                                    
                                                      
Happy Sunflower

                                                                        
Giant Sunflower
                                                                                     
Sunflowers with details added


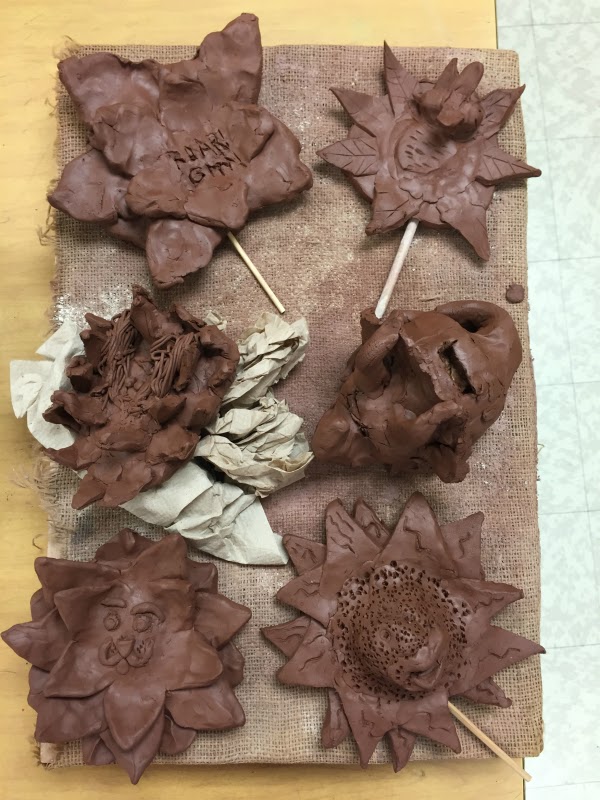
sunflowers ready to dry

  • We left some of our sunflowers the natural color, but if desired, they can be decorated with glazes or acrylic paints. 
                                                      
Glazed Sunflower Garden Art


Saturday, June 20, 2015

Pop Art Style Clay Pizza Sculpture

Olive and Mushroom slice, Donut covered pizza slice

Pop Art Style Clay Pizza Sculpture
(week #5 of a 6 week clay course)

For this week's class, we looked at some of Claes Oldenburg's food sculpture pieces as inspiration for making our Pop Art Style Pizza sculptures. I told this group to go wild with the toppings and put things on their pizzas they wouldn't normally expect to see. They had fun with this project and quite a lively discussion about what types of things they'd add to their sculptures.

Supplies and Materials Needed for this project

Sketch paper and pencils for idea generation
Low fire clay
Large paper circle, 16" in diameter, cut into 8 equal slices
Rolling pins 
Modeling tools
  • Make quick sketches of pizza slices with favorite toppings
  • Roll out the clay, using strips to ensure uniform thickness
  • Cut out a 16" diameter circle from paper. Fold into 8 sections and cut into pieces to create patterns for pizza slices
  • Put slice pattern onto slab, trace and cut pizza slice shape
  • Add a snake shape for the crust. Slip and score to adhere securely.
 
Adding clay for the edge of the crust
Securing the crust 
    Adding toppings to make a pizza face
  • Next, use remaining slab bits to cut out pizza toppings such as vegetables, pepperonis, olives, etc.
    Cutting out toppings   

                                                           
  • Use a garlic press to make cheese. Securely attach all toppings
                                                        
                                                          
Mega cheese pizza


  • Allow clay to dry thoroughly and then fire.
  • Glaze or decorate with acrylic paints and a gel gloss medium 
  • Makes a nice display presentation to put the pizza slices arranged in a circle inside a clean pizza box.
                                                      
Decorated with acrylic paint and gloss medium
                                                         
Decorated using acrylic paint and gloss medium

Friday, June 19, 2015

Egyptian Style Clay Canopic Jars


Egyptian Style Clay Canopic Jars
(week #4 of a 6 week clay course)

For the 4th week of our clay course, we learned about how the Egyptians designed and built ceramic jars to hold the internal organs of people who were mummified. The jars were buried with the bodies. We decided to make our own version of these jars, choosing our favorite animals and using the jars to hold things like art supplies.

Supplies Needed:

sketch paper and pencils
low fire clay
rolling pins to make slabs
cutting tools
paper to make patterns
paper towel tubes with heavily taped bases
 
Rolling out the slab           


  • Make quick sketches of animals that would make good designs for the jars
  • Roll out the clay. Use strips to ensure the clay is even
  • Make a pattern using paper by wrapping some around the paper towel tubes (the tube ends covered in heavy masking tape to prevent their cutting through the clay). Make the pattern about 6 inches in height and wide enough to roll around the tube one time
  • Trace the pattern onto the clay and add a little extra to the width so the clay will wrap all the way around the tube and have a little extra for joining at the seam.
  •  Tape the pattern around the towel tube
  • Wrap the clay slab rectangle around the tube and join the seams by slipping and scoring. Leave the tube INSIDE the clay for now. It will be removed later before drying.
  • Wrap clay slab around the tube and join seams
  • Pinch out a small pancake and set the clay covered tube on it. Cut out a circle at the base. This will be the bottom of the jar. Trim excess and using slip and score, attach the bottom to the jar.
    • Push clay to end of tube and add a bottom for the jar, making it from a small pancake slab. Attach securely.
     
     
    • Trim the top of the tube so it is 1 to 1 1/2" above the top of the jar.
    • Using a ball of clay, shape an animal head, adding features like ears, horns, eyes, and textures to show feathers, fur, scales, etc.
    • Make an indent in the bottom of the animal head and attach it to the top of the jar, slipping and scoring the two seams.
    • Using a clay tool, cut a line around the jar to separate the head from the rest of the jar. The line could be wavy, zig zaggy or straight. 


Use modeling tools to add details


  • Next, draw hieroglyphs to add your name down the front of the jar. Use the modeling tools to add textures like fur, scales, feathers, etc.    
    Adding ears
                          
Completed jars before firing


jar made by a fourth grade student

                                                     
Completed canopic jars

                                                       
Paper towels added before drying


Some FINAL and VERY IMPORTANT steps.......

  • When the jar is completed, remove the head and set aside. Have someone hold the jar at the base and then use two hands to GENTLY TWIST the paper towel tube UP AND OUT. Note:  The tube MUST be removed before the piece is set out to dry or the clay will shrink around the tube and not be removable without breaking the jar.
  • Put a paper towel on the top of the open jar.
  • Set the head in the proper position on top of the paper towel on top of the tube. Allow to dry.
  • Before firing, separate head and body and toss out paper towel.
  • After firing, glaze or decorate with acrylic paints and a gloss medium or modge podge type product.